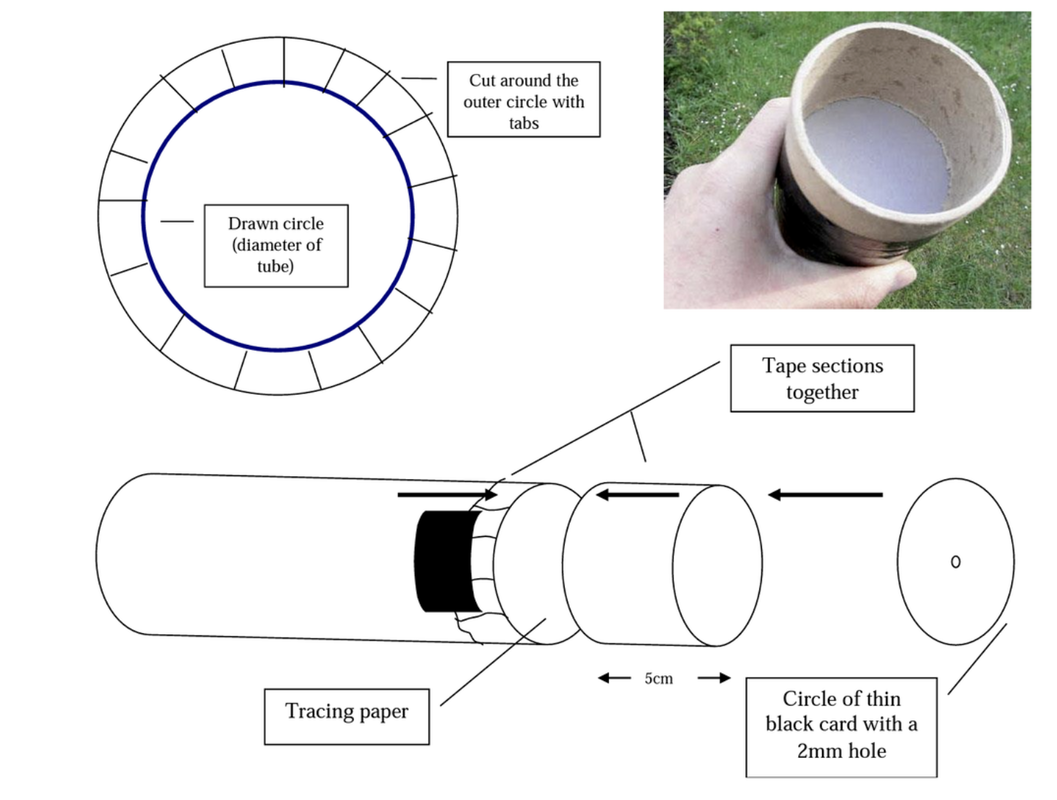
Camera obscura
The word photography means drawing with light which derives from the Greek photo, meaning light and graph meaning to draw. Photography is the process of recording an image on different type of cameras. The name comes from the Latin words for dark Obscura and room camera. Alhazen or Ibn al-Haytham is said to have actually invented the camera Obscura as well as the pinhole camera which is based on the same idea. He carried out experiments with candles and described how the image is formed by rays of light travelling in straight lines. The word camera obscura means box with a hole in it which allows light to go through and project an image onto the surface directly infant of the hole. You would then trace the outlines of the scene you can see projected onto the paper inside. And because this camera Obscura uses a lens, which creates a relatively large aperture, you get a sharp, colourful image on the paper.
|
We made the camera obscura by using a pringles can and painting it black after that we put a small pin hole on it then put a lid over it so no light can go through we also had to let the paint inside dry, when it dried we had to look for any parts or small bits that weren’t painted then go over it again with the spray paint
|
|
|
|
Pinhole Photography


My first impression of these photos where different to other photographs as these are unique and these are not photos you would see in an everyday life. The pictures are all taken in someones mouth so it gives a dark affect his purpose are also about capturing genuine emotions and an unfiltered reality. It is a unusual piece of work as it shows different pictures made and taken from a pinhole camera these pictures where taken the reason he made and took pictures with a pinhole camera was because he was teaching kids at college and some kids couldnt afford cameras so it was a much more cheaper but harder way to take pictures. There are a lot of benefits of using a pinhole camera one of them being there is no focusing required for image formation. This is reliable evidence that pinhole cameras where made a very long time ago because Justin Quinell said that pinhole cameras where made in the 90s.
How i made my pinhole camera?
I started of by making a small rectangular hole in the centre of the Pringles can. Then i covered up the rectangular hole with a piece of aluminum material. Next i used a small pin to make a very tiny hole on the aliminum, this tiny hole will be used as a lense after all this i would tape a mini shutter over the pinhole that can open and close after i done that i got a small amount of black paint then started to cover the inside of the Pringles can after all of the paint dried there was a few littles bits of small areas that wernt covered by the paint so i used a small amount of spray paint the parts that wernt painted after this has all dried you would put a bit of photographic paper into the Pringles can/Pinhole camera (this must be inserted inside a dark room or the photographic paper wont work for the pinhole camera as it has already been revealed/exposed to light when it cant be. Next you will take your pinhole camera where you want to take a picture you will slowly start to open the shutter to reveal the tiny hole to expose the photographic paper to light you will keep it open for 7 seconds (depends on how big the pinhole is) next you will develop the image in the darkroom.
Abelardo morell


My first impression of these photos was that they look very nice and cool they are also very detailed photos taken by Abelardo Morell. His style of taking pictures is mostly street photography and portraits. he is also known for turning rooms into camera obscuras and then capturing a image. My favourite picture is the top middle because it has very nice colours. this picture is a view of central park looking north, Taken in Summer 2008.
Vjeko Sager

My first impression on this art work that it has a lot of simplicity. It also has many unique patterns, shapes, cuts and folds. When the artist was making the cuts it looks like he done them very precisely almost creating a rupture. It seems as he cut the piece of paper with scissors or a very sharp knife. This type of art and photography is called decorative art. When doing this type of art it is like drawing with scissors or a knife because when you go to cut it, it leaves a mark like a pencil.


In my pictures I like the light getting blocked by the obstruction creating a shadow affect. The cuts where also made really precise using a scalpel next time id like to improve the amount of space i used because i left some parts of the paper where i didnt make any changes and just left it black
Francis bruguiere


|
My favourite photo of Francis Bruguiere is this one to the left because it has a lot of detail. The cuts made on the paper look really defined you can also see shadows of the slighly folded pieces of paper
|


Before

|
After
|
homework- 30 images of light


Collaborative collage


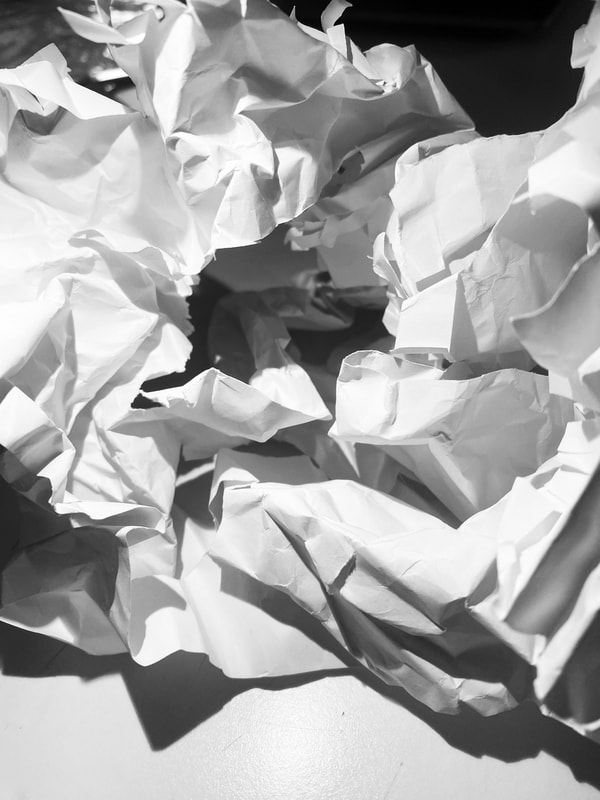
I started of by making a coloured piece of paper using the printer i used green on one, purple and red on another one. I decided to use the photos of my scrunched up pieces of work. After i had printed 2 different pieces of paper i glued them onto two seperate pieces of black A4 card, i went onto cutting the papers that was stuck together with similar shapes, Before i stuck them on top of each other i had to cut some foam to put in between the two cards so they looked separated. After i put everything together i had to take some photographs but i need to attach something to the back of it so it can stand on a flat surface, after i done that i had to turn on the soft box (A light that has a layer
Handmade Negative


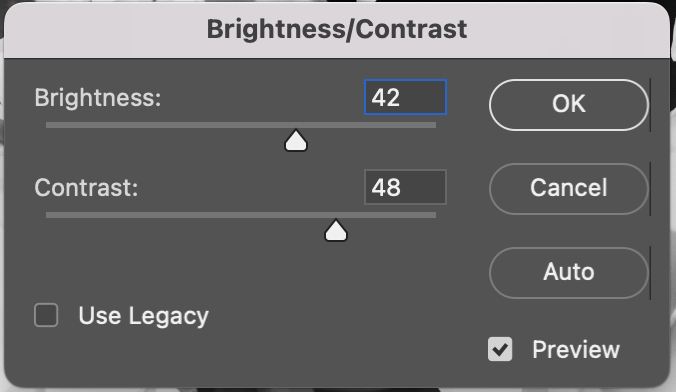
I edited my handmade negative with photoshop by First of all transforming it into a black and white image then going onto changing the brightness and contrast to define the black and white colours with setting adjustments of brightness -9 contrast 75 and the other photo with brightness- 52 and contrast 74
Light painting
|
|
my review on this video is that the photographer is very professional by the equipment they are using. They also go into deep detail about what they are using to take pictures with. When they are taking pictures they also have the camera/photographer in level with the object or person they are taking a picture of. The lights they where using were really bright so it was really defining the work they were doing. The tone of the background they where doing there work in was really dark this was another reason that the coloured lights where really defined.
|
Light Painting Experiment


First of all we started by securing the camera to the tripod so the camera would stay still and not move. We also had to make sure the ISO was reasonably low so the camera wasn't sensitive to a light source, when it is high it can degrade the image quality and certainly letting to much light in. We went onto experimenting with different shutter speeds, we started of with 10 seconds then increased to 15-20 because we found out that we needed more time to draw our paintings. We also saw that we needed to let the camera focus with the main light source on then turning the light back back off after, otherwise the light could have been blurry and the image may have not been clear. After we found out the perfect shutter speed to draw a heart we went onto trying different shapes e.g first letter of name, hearts and circles. I really struggled with with writing my name because we had to draw it backwards. I found the shapes much easier as you can draw freely and you don't need to do anything in any specific way.
light as a subject
Bianca Sforni:
Bianca Sforni


|
My first impression of this photo taken by Bianca Sforni is the intense, vibrant color. The close up images are of natural forms and are bright red. There are also some images which focus on the landscape. The objects in the far distance create a silhouette affect. This piece of photography also shows a landscape image of the distance, The colours and contrast of the photo creates a dark imagery of the objects in the far view. the camera position is at a high point so it can capture more objects in the frame. Overall the style and genre of this photo is that it is casual and quiet.
|


To start I went out on the grass field and I picked some flowers with a large size, I placed them onto a light box where it reflected a lot of bright light coming from under the placed flowers.I took a some pictures, then I decided to add a pink filter over the Lightbox this created a colour effect i tried a yellow filter and a blue one when I was taking my photos I had to make sure that the angle of it was from a high view as my pictures are inspired by my photographer. Next time id like to put multiple filters over each other so it can created a mystery colour and also include a wider range of flowers, I would also want to find out if I can change the brightness on the light box so the imagine can have a higher contrast.
edited photos


I edited my photo by turning down the brightness to -88 and turning up the contrast to 100, I done this because my photographers have a dark background with an image on top
Final Project
I started of by printing my images double sided on
